You can contact me at

homemademontessori@yahoo.com
Showing posts with label math. Show all posts

Monday, August 09, 2010

Great New Website!


I've just recently come across a new website for getting really good montessori cards/materials to print and use. It's called Montessori For Learning Instead of charging a small fee for each item you'd like to download, there is a small $4.49 fee for a month's worth of access to the site to download and print as much or as little as you'd like. Join for just one month or join for several months, it's up to you! New materials are added weekly. There's even a free section to get you started. I was a member this last month and was thrilled to download many great math and reading resources to use for my kids. We aren't using a montessori album anymore, but we still use our many montessori materials to supplement our school work! With my son, I always wished there was more math worth...especially for the golden beads. I knew I could always create some, but I just wasn't find the time. There are a lot of activities for math and reading up right now. My daughter is excited to get to work with this golden beads this year.


Also, on the website you'll find administrative forms, fun materials like dominoes that go with the blue reading series and many other things!


I receive many emails from people all over the world, I still can't believe how many people follow my little blog! It's amazing and I'm glad you are all able to use my materials I've created for my children. The most common questions I'm asked are about what manuals are the best. I can't answer that because I haven't owned all the different manuals. I can say that I've owned almost all of the Montessori Research and Development manuals and I found them to be a great deal. They are inexpensive, well thought out, clear and precise and come with everything you need to create black and white cards for the activities. I personally, just wanted more exciting cards, which is why I started this blog! If you work in a montessori school, I highly recommend them.


However, if you are a homeschooler or just a stay-at-home mom, I would highly recommend that you go to the Montessori For Learning website...since I am not actively making cards right now, this would be a great option. You will get albums and the cards that you can download separately or just download a set of cards and it has the instructions from the album right there. This will help any Montessori parent understand what each material is for and how best to utilize it with their children. I will be using the cards I got from the site!


Stay tuned:


Soon I will be uploading pictures of a felt continent map I made for my kids. I just realized I never posted pictures. We had a homeschool group come over one day a week for several months last year and we used this huge map I made, along with the world puzzle map and many other resources. I'll tell you all about it (with instructions) very soon!

Thursday, October 29, 2009

Multiplication, Division, Addition & Subraction Strips

Sorry for being MIA. I babysat last minute for my neighbor, full-time all summer long to her two girls in addition to my 3 kids. It was a busy period since her kids were really young (3 yr old and an infant). Then September I was getting my kids school flow going and this october has been a nightmare! First, my grandma passed away and I flew out of town for that and then my husband brought the wonderful swine flu home from the hospital and decided to infect all our kids and me. On top of that I got a really bad cold. We are all okay and I'm almost over my cold now, however, my husband just came home from the hospital again with a fever and strep throat. I really hope, he doesn't infect us all again! Anyways, back to montessori things....


I downloaded and printed out (for free) Addition, Subtraction, Multiplication and Division strips and their answers from http://www.jmjpublishing.com/jmjmontessoried.html months ago. They are redoing their website, so it's not currently uploaded. At the bottom of the website is an email address, if you wish to contact them and see when those will be back up for printing. My problem with the strips is that my son takes forever to find the answer paper. He'll answer the problem quickly, but then takes 5 mins (not joking) to find the right answer paper to put next to the problem. Then this activity takes the whole day and we don't get any other schooling done. I've tried to fix the problem by just giving him the problem strips and putting them on the floor in a row and then having him just right the answers on the paper in order down so I can check them. It worked okay, but wasn't nearly as fun and hands-on as he likes. So I came up with a solution today. I pulled some ceramic tiles out from my craft room. They are called "make-it mosaics" and they are about 1" square ceramic tiles. I had a small bag of 25 tiles that I bought a long time ago for about $2-3. If you use a dry erase board marker, it wipes right off! So now I give my son the problems, the tiles, and a marker. He writes the answers on the tile and puts it next to each problem. When he's done I check the answer and we wipe the tiles clean for next time. He loves writing on the tiles and it's so much quicker. Click here to see the tiles. I bought my tiles at Michaels, but I'm sure they can be found in the craft sections of Joann's, walmart and hobby lobby as well. They are really popular and come in all different colors.

Monday, December 22, 2008

Math Games!

Hey everyone! Sorry, I haven't posted anything for a while. My kids and I have been sick and then of course, the holidays have kept us busy. My husband is busy working all week (no days off *sigh*) and I've been busying trying to handle most of it myself.

Anyways, I had a lot of fun with my son the other day. We've been learning basic addition and subtraction using the montessori methods and I wanted to do something fun for him the other day to spice it up a bit. I decided to play chutes and ladders with my son. I got rid of the spinner (although you can use the spinner instead) and traded it for a regular 6 sided die. We played like you would normally, but instead we rolled the die twice and added the two numbers together and went that many spaces. It really is helping him get faster in his addition facts. I have him write his problems down. The first game he did 24 problems before I won and the second game we only did 5 problems. I plan to buy the 10 and 20 sided die from the learning store and a blank die so we can get harder problems, etc.

To plan the game with subtraction, use a 10 sided die and say for the whole game whatever you roll subtract and then pick a number to subtract like 2 and then go that many spaces. or use the 10 or 20 sided die and use a 6 sided die to roll to see how many you need to subtract.

Another great thing about chutes and ladders is that the spaces are numbered 1 to 100. So it's also great that you can roll the die and say you get a 6. Have your child add 6 to whatever the number is that the person is on (say space 22) and then move their person to that numbered square without counting the spaces out. They gotta do the math! Also, if they go up a ladder, have them figure out how many spaces they got to skip buy using the numbers on the two spaces or when the go down a slide how many spaces did they get behind. there a lot of great questions you can ask and have them figure out. You don't get tons of problems in, but your questions are word problems and you're helping them use math in their life so they are more interested. You can also ask questions about how many more spaces do you need until you win? etc. just keep asking questions in conversation as you play and have fun!

Wednesday, November 05, 2008

Large Bead Frame Tutorial

I painted the side and added the numbers using my labeller

Did you know you can take acabus' apart? I had no clue and I got this idea from one of the many yahoo groups I am on. To make your own (cheaper) bead frame you need:

acabus (I used the Melissa and Doug one for $12)
green paint or permanent marker
black and white paint
paint brush
screwdriver

On the Melissa and Doug acabus there is one screw on each side of the wooden dowel across the top. Unscrew both of those screws. Then on the bottom one of the sides of the acabus has 2 screws holding it in place (the other side has none). Unscrew those too. Now this acabus is well put together and I'm sure it was glued together before it was screwed, so you have to tug and jiggle it around a bit, but that side with the screw will come loose and then you'll be able to pull the wooden dowel and the 10 metal rods and all the beads.

Remove all the beads from the rods and then remove the 1st, 5th, and 9th metal rod from the socket and discard. On the first metal rod (actually the 2nd one, but remember you removed the other one so now it's first), put on 10 of the green beads. On the next one, put on 10 blue beads and on the third one put on ten red beads. Then there should be a space and then repeat that again with 10 green, then 10 red and then 10 blue on the next 3 rods. On the last rod, there is supposed to be 10 green again, however, you are now out of green beads. On the melissa and doug acabus they have natural wood colored beads, so use 10 of those beads and paint them green. If you are lazy, like I was, you can use a green sharpie permenant marker and just color them. It worked great and wasn't messy at all. From a distance you can't even tell that I just colored them, but up close you can (see the last picture on the blog of the close-up). Once they are colored put them on the last rod. Then replace the other side of the acabus and screw it all back into place.

With the white paint, paint the entire front of the left side of the acabus. Then mix the black and the white to make grey and once the white paint is dry paint grey over the white starting below the first 3 metal rods all the way to the bottom so only the top is white. Then once that is dry paint from the below the 6th rod to the bottom with black paint. Lastly, you need to put the numbers on. You can paint them on with red paint. I used my label maker, because, again, I'm lazy and it's less messy. My label maker was only $15 at office depot and I use it to label all the containers I use for my montessori materials so I use it a ton! The numbers are

1
10
100

1,000
10,000
100,000

1,000,000

Anyways, I just thought it was great. I made this and it cost 1/2 the price of buying the cheapest one I could find anywhere on the internet and I also save the $8-15 they charge you for shipping. You could easily make the small bead frame the same way.

made it myself from melissa and doug acabus

montessori large bead frame

Monday, October 06, 2008

Give Me a Five!

I'm back from vacation! I got sick right after I got, so I was MIA for a while. I wanted to share my experience about teaching my son to tell time, but I remember how confusing it can be and how hard it can be to remember that the 2 stands for 10 minutes, etc. I taught my son (he just turned 6) the o'clocks first and of course that was no problem. Then I put the clocks away and introduced him to the 5 short and long chains and arrows. I had him arrange the short one first and he did that easily. Then we worked on the large one. I wanted him to learn to count by 5's so he could just count by 5's around the clock to tell the minutes until he just 'remembered' on his own after some time. So after we worked on the long chain and arrows, I asked him to find a pattern on the numbers. If you look at the ones digit, I pointed out that there is a pattern of 5, 0, 5, 0, 5, 0, etc. Then when you look at the tens digit you get 1, 1, 2, 2, 3, 3, 4, 4, etc. so I pointed out that there is two of each number in the tens while the ones just repeat the pattern 5, 0, 5, 0, etc. So then, I had him write the numbers to 60 counting by 5's on his own (we never even practiced or learned counting by 5's yet) and using the pattern he was able to figure it out. It took him like 7 minutes to figure it out and write the numbers down, but now when he if he forgets what comes next, he thinks of the pattern.

Okay, so that's all fun and honkey dory, but what does that have to do with givin' me a high five? PRACTICE of course! I needed him to practice counting by 5's and he was already burnt out from the chains and writing numbers, but we needed to practice while it was all still in his head nice 'n fresh (he he). So I told him why we call it give me a five (because we have 5 fingers) so I would say "give me 40" and then he would give me 40 fingers, which meant he had to count to 40 by counting by 5's and give me a "5" each time he counted until he got to 40. He thought it was a great game! We continued practicing while I cooked dinner...stirring with one hand, learning to count by 5's with the other, he he. But now he can count by 5's. It's great because now when we're standing in line I just say "give me 85" and he's entertained and learning! He's getting much faster. After doing this for a while, we brought out the clocks and I said start at the number 1 and count by 5's and told him that was how many minutes. So now he checks the hour, counts by 5 around the clock and will give me the time. He's starting to associate 3 with 15 and 1 or 2 other numbers so he's much quicker now, but ideally, he can tell time already. He'll just keep getting quicker with more practice. What I thought was going to be a long process of trying to teach him to tell time, actually ending up only take a day and half and as excited as I was that he "got it" so quickly, I was kinda said, because now my cute clock cards I bought and my cute teaching clocks are neglected. Ah well! Hope this helps someone else!

Sunday, August 10, 2008

Dominoes!

Whoever said dominoes were just a game? I think dominoes are a great learning tool, especially for early addition. I bought my son his own dominoes and I sit him down with them and a piece of paper. He picks a domino and counts how many dots are on one side of the line and writes that number down. Then he does the other side and puts the + then the number. Then at first I have him count all the dots for the = I have him do about 10 problems at a time. After I know he is familiar with the dominoes with the + 0's, 1's and 2's, I separate those dominoes into their own bag and i have him pick 10 of those dominoes and have him count the two sides, but he trys to figure out the answer without counting.

He loves doing his math like this. It's so much more entertaining for him than worksheet after worksheet...and you don't need counters or anything other manipulatives.

Also, once they are getting good at memorizing the equations and answers, switch from dominoes to dice. Give your child a die and have them roll it and then roll it again and have them add the two numbers. Still worksheets aren't necessary! Also, at a teacher supply store they have dice that go up higher (like 20 sided dice) or blank dice. You can get a blank die and 2 normal die. with the blank dice put the numbers 10-60 on them and have them roll the ten's dice and then a normal one to get the first number like "40" and then "2" so 42 is the first number and do it again to get the second number and add them together for harder problems.

Wednesday, March 05, 2008

Large Number Cards

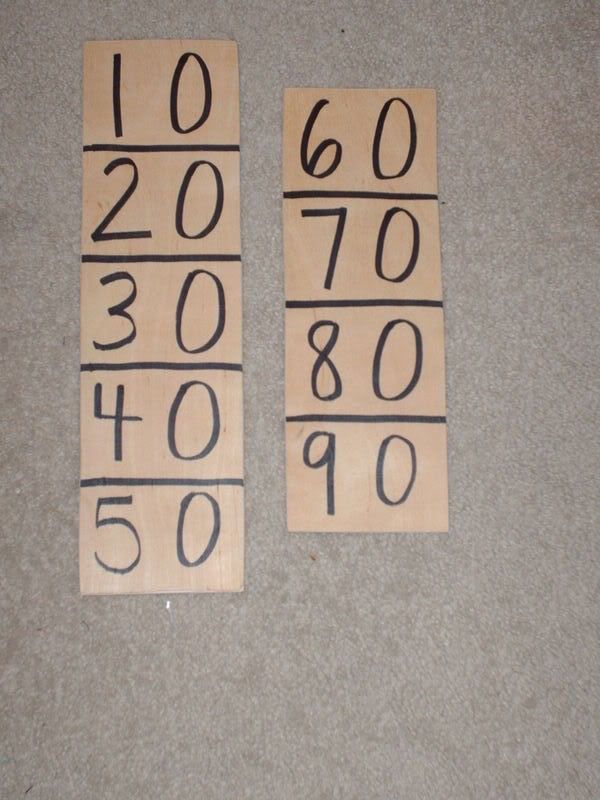
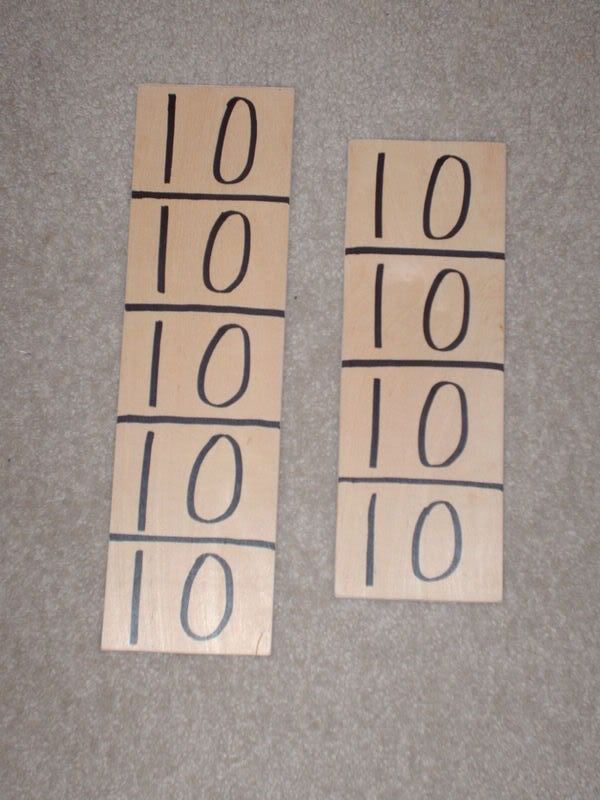
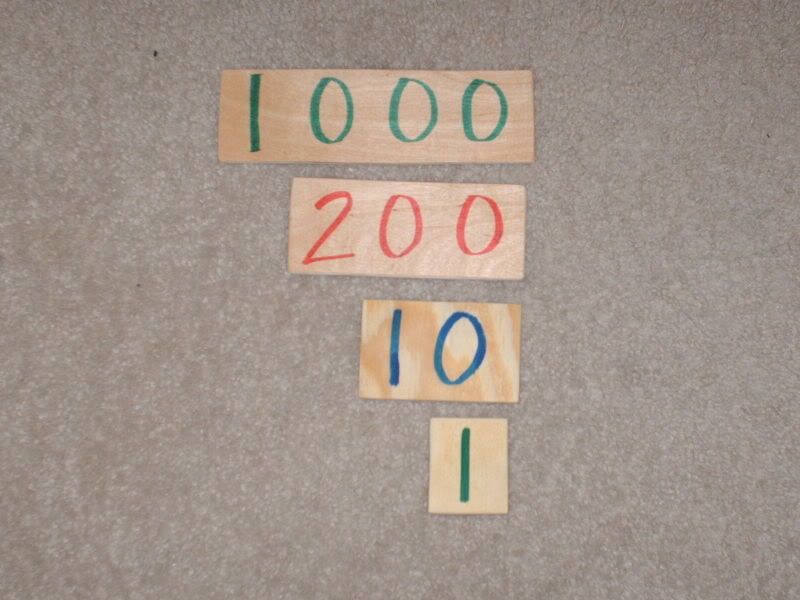
I thought this would be something I would just buy, orginally. I mean it's just $10. Then I found out that to do the activities with them you need 2 sets of large number cards and 3 sets of small number cards and then decimal cards! That's $50 +shipping without the decimal cards. Didn't take me long to change my mind, LOL. Here are my large number cards and instructions on how to make them!
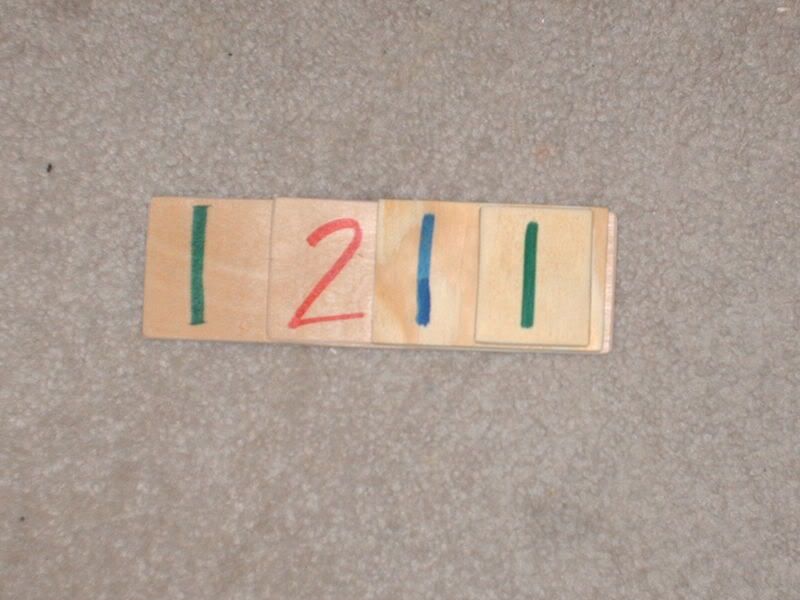
If you don't want to cut them from wood, make them from foam, cardboard or cardstock :)
(9) 2" x 2.5"
(9) 4" x 2.5"
(9) 6" x 2.5"
(9) 8" x 2.5"
Then you need 3 sharpies in red, blue and green. Write the numbers 1-9 in green on the pieces that are 2". Use a blue sharpie and write the numbers 10-90 (10, 20, 30, etc.) on the 4" pieces. Use the red sharpie and write the numbers 100-900 on the 6" pieces. Then use the green again and write the numbers 1000-9000 on the 8" pieces.

**Remember to space your numbers nicely on the spaces. You should have 1 number for every 2 inches of the board. That way when you stack them ontop of each other you are fully covering the 0's underneath.


Hope this helps you! I'll be finishing up my small number cards soon too!

Ten Board


You make this the same way as the Teen board, same dimensions and everything. The only difference is you'll have the numbers 10-90 written, instead of all the numbers being 10. The little pieces will still have the numbers 1-9 on them.


Teen Board

I finished these boards up yesterday. I didn't finish the numbers to put ontop of them yet. They are waiting to be sanded. I've been sick these last 2 weeks with a head cold that just makes me so sleepy! Anyways, here's how to make the teen boards.

Cut a piece of wood 16"x5"
another one that's 13"x5"
Then 9 pieces that are 3"high x2" wide

the 16" board will be separated into 5 sections and each section will have the number 10 written on it. The 13" board will be separated into 4 sections. The 3"x2" pieces will have the numbers 1-9 written on them. I just used a chisel tip (fat) sharpie marker in black to make the lines on them. You could also wood burn them in (which would be really cool) or paint them on or vinyl numbers, etc. Have fun! They're really easy to make and again, much more fun then cardstock. If you can't cut with wood, make them from foam sheets, or foam board, felt, etc. Use your imagination. I just think a more 3d object makes learning more fun than paper :)

Sunday, February 24, 2008

Geometry!

I'm getting ready to start teaching geometry in the fall to my son. I just made the first and second series cards for my son. Download them free on my website.

Money Cards

I made some penny and nickel cards for extra practice for my son. He was having a hard time getting the concept that one coin (nickel) means 5 cents. How 1 equals 5, he just wasn't understanding. He just kept getting all the coins confused because he wasn't getting this concept so these cards have really been helping! To download them go here

Wednesday, February 20, 2008

Bead Stair


Besides my wood cutting/sanding, I've been working on the bead stair and beads for everything the decimel activity, decanomial board, snake game, negative snake game, long and short chaings, etc. You need a lot of beads! I bought most of my beads from http://shipwreckbeads.com/ I bought 8mm arcylic multi-faceted round beads in all the different colors. For $4.95 I got 900 beads of each color. The only color they were missing was brown and I just put in a order for that somewhere else! So for $45 I got all the beads I should ever need (besides the gold ones). I got the gold 8mm round beads from Joann's in packs of 400 for $3.95. Wait for the jewelry to be on sale (it frequently goes on sale for 25-30% off) and then if you are a homeschooler or teacher you can get a Joann's teacher card that will give you an additional 15% off all regular, sale and clearance items (whenever you don't use a coupon!). I also bought the wire there. I am using 16 gauge wire. I use gold wire for the gold beads (it looks so pretty this way!) and the silver for all the other colors. I used math u see with my son last year and just sold the blocks to someone online, but kept the boxes. I'm hoping all the beads for the decanomial set will fit in here. So far I have 55 10 bars, one, two, and three bars..the rest just have about 20.

Here is the colors to make the Bead Stair:

1 red

2 green

3 pink

4 yellow

5 light blue

6 brown

7 white

8 violet

9 dark blue

Scroll Saw


When I first decided I wanted to make wooden montessori materials instead of laminated cardstock, I thought I would need to buy everything new, because there was no way buying a $150 scroll saw and then the cost of wood and the time making it was actually going to be cheaper than just buying the materials. I went searching on my local craigslist and low and behold! I scroll saw for $40. Yeah! The guy I bought it from didn't know much about it and I couldn't find the instructions anywhere online. Oh well. How hard could it be really? It's actually not hard at all. Once you figure out how to put a fresh blade in.


Now, what about the cost of the wood? Surely, that was going to be expensive...or so I thought. I never really realized how little wood I would actually need and how reasonable it was. I bought a 4'x8' piece of beautiful Birch plywood from Lowe's that was 1/4" thich for $20. I had the at Lowe's cut it into 1/3's since Lowe's and Home Depot will give you 2 free cuts of wood. This made it fit in the car easy and then I cut one piece into 1/3's with my jigsaw to make it easier. I think next time, I will tell the Lowe's guy to cut the sheet into 1/5's so I won't have to do that. To give you an idea of just how much wood it was this is a picture of 1/3 of the wood I got.


With 1/3 of this wood, I have already cut the pieces for these materials:

Addition Board & strips

Subtraction Board strips

2 Sets of Large Number cards

3 sets of small number cards

85 addition strips

30 addition answers

Ten Boards and numbers

Teens Boards and numbers


So really in the end, it has proven to be very inexpensive. It's more time consuming to make than laminated cardstock, however, the results are a lot prettier, long lasting and my son is getting so excited over the materials.

Monday, February 18, 2008

Cubico Game


I saw this game in my Montessori Play and Learn book, on page 67. I thought it was a neat game! It is made up of 9 die. Each side of each die is a different color with a number on each side. The child then picks a color and arranges the die in rows 3x3 so that when you add the first 2 numbers in the row it equals the 3rd number. You can add vertical and horizontally and it should all work. Instructions are on page 67 of this book as well as pictures. http://www.montessorimaterials.org/ has paper die that you can cut out for this game if you wish.

http://www.montessorimaterials.org/Math/Cubico.pdf

You will learn quickly that I am someone that loves the wooden materials. They are so much more durable and I have 3 children and my oldest is 5 1/2 so they will be used for a long time. I'd rather put it a little more effort and money now, then have to remake everything every year. My children can get rowdy, LOL.

How I made these:

JoAnn Fabrics had a package of 3 wooden cubes for $0.99. They were about twice the size as a regular dice so I thought it was perfect size for this game. I bought 3 packages and painted each side a different color and then put the numbers on! It didn't take very long to do this. It was not expensive and it will be long lasting. I found wooden indoor/outdoor craft paint that was non-toxic at walmart and will be spraying it tomorrow with non-toxic protectant.