Friday, November 21, 2008
Macarena Bones
This is my first ever attempt at making any type of movie. This little movie took forever to make last night and a little this morning. I finally figured out some very basic things that made it so much easier this morning (if only I knew them last night!) So please leave me a comment and let me know how you liked it!
This song is by Dr. Jean from her cd "Kiss your brain" I have two of her cd's and absolutely love her songs. I plan to buy more of her songs. I really, really hate when they don't have 30 second sound bytes so you can see if you like the songs or not. So for those of you that haven't heard from her, check out this song and no her others are really fun and easy for kids to follow, as this one is. I seriously want all her cd's, lol.
I plan to make 3-part cards with the pictures I made to use in this video, if you would rather teach with those, but the song is fun, I just had to share it. The words to the song are:
Tarsals
Tibia
Fibula
Patella
Femur
Pelvis
Ribs
Sternum
Carpal
Ulna
Radius
Humerus
Hey! Kiss My
Cranium
This repeats 4 times. And it is to the macarena dance, so dance along too if you want, LOL. I plan to have my son watch the video from time to time, but mostly to teach him the song while we point out the bones on a large picture of a skeleton (that I still need to get) and then using the 3-part cards as practice by themselves and I will probably make a labelled and unlabelled skeleton worksheet you can use as a test.
Just know, that it's finally getting really cold where I live and so this weekend and next week I will be making curtains for my bedroom. We have 4 large windows in our master bedroom and we are freezing! Plus, we will be out of town for 4 days for thanksgiving. I have made some singular and plural language arts cards, but I still need to fix a couple of things....so look forward to the 3-part cards and those cards in about a week and a half. I also have been collecting cards for the continent cards that I hope to make soon as well.
Tuesday, November 18, 2008
Continent Song
My kids really like this continent song. This isn't my video. I had a cd with this song on it last year and I can't find it anymore, but found this cute little boy singing the same song on youtube.
I taught this to my daughter's preschool class today and the kids had fun with it. I taught them about the globe and I used an inflatable (beach ball type) globe at first. I talked about the shape being a sphere and then I cut the globe in half so it'd match perfectly with the world map so they can see how they went from a 3d to a 2d object and we talked about why antarctica in on both parts of the world map, etc. During the song, I pointed to each of the continents on the world puzzle map as we sang it and then handed them out each a puzzle piece and they put it in the right spot and said the continent's name. I also traced North America, South america and antarctica. I cut around the continents (we didn't have enough school time to let the kids do it) and the kids glued the continents on the right spot on a paper plate. Then with finger paints they painted the continents green and the rest of the plate blue for the ocean. It was fun. Then we played this CD:

We listened to 4 different songs on the track to here the different types of music you'd hear around the globe and I handed out some music instruments and we played and danced along to the music. I kept the cd on while we made the globes and had free play afterwards so they could hear all of the songs. You can buy the cd here. The cd is a ton of fun! I also got this book from our public library, it's called "Around the World in Eighty Poems". It has a bunch of small kid poems describing the culture or some tales of the different countries around the globe. The pictures are wonderful as well. I really want to buy this book!
I taught this to my daughter's preschool class today and the kids had fun with it. I taught them about the globe and I used an inflatable (beach ball type) globe at first. I talked about the shape being a sphere and then I cut the globe in half so it'd match perfectly with the world map so they can see how they went from a 3d to a 2d object and we talked about why antarctica in on both parts of the world map, etc. During the song, I pointed to each of the continents on the world puzzle map as we sang it and then handed them out each a puzzle piece and they put it in the right spot and said the continent's name. I also traced North America, South america and antarctica. I cut around the continents (we didn't have enough school time to let the kids do it) and the kids glued the continents on the right spot on a paper plate. Then with finger paints they painted the continents green and the rest of the plate blue for the ocean. It was fun. Then we played this CD:
We listened to 4 different songs on the track to here the different types of music you'd hear around the globe and I handed out some music instruments and we played and danced along to the music. I kept the cd on while we made the globes and had free play afterwards so they could hear all of the songs. You can buy the cd here. The cd is a ton of fun! I also got this book from our public library, it's called "Around the World in Eighty Poems". It has a bunch of small kid poems describing the culture or some tales of the different countries around the globe. The pictures are wonderful as well. I really want to buy this book!
Wednesday, November 12, 2008
Human Anatomy Book
I just found this new book called, "The Way We Work." It is an excellent book for kids teaching about the human anatomy. It's accurate and the pictures are great. This is not a textbook format type book, so the pictures aren't what you'd see all serious-like in a textbook. They have some normal textbook type pictures that are labelled and then the others are more like sketches or drawings that a kid would do....still accurate, but I think it appeals to the kids more this way. It is such a great book, I've been having a good time reading mine and can't wait to start using in school with my son! Just thought I'd give that recommendation out there. Go check it out!
Wednesday, November 05, 2008
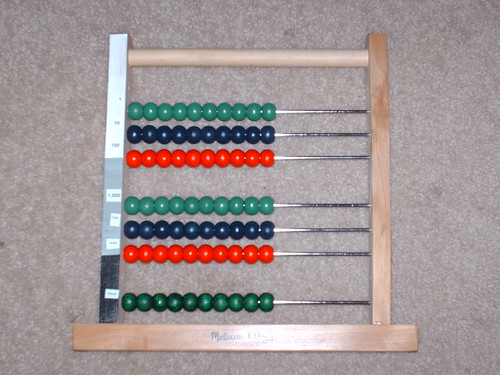
Large Bead Frame Tutorial
Did you know you can take acabus' apart? I had no clue and I got this idea from one of the many yahoo groups I am on. To make your own (cheaper) bead frame you need:
acabus (I used the Melissa and Doug one for $12)
green paint or permanent marker
black and white paint
paint brush
screwdriver
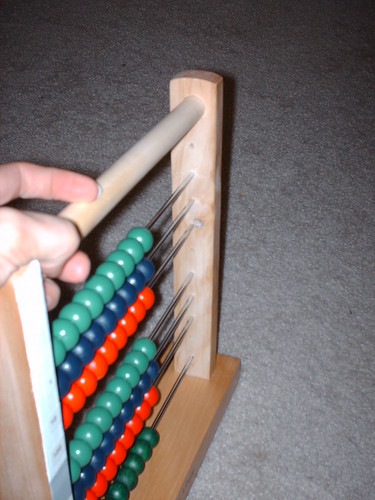
On the Melissa and Doug acabus there is one screw on each side of the wooden dowel across the top. Unscrew both of those screws. Then on the bottom one of the sides of the acabus has 2 screws holding it in place (the other side has none). Unscrew those too. Now this acabus is well put together and I'm sure it was glued together before it was screwed, so you have to tug and jiggle it around a bit, but that side with the screw will come loose and then you'll be able to pull the wooden dowel and the 10 metal rods and all the beads.
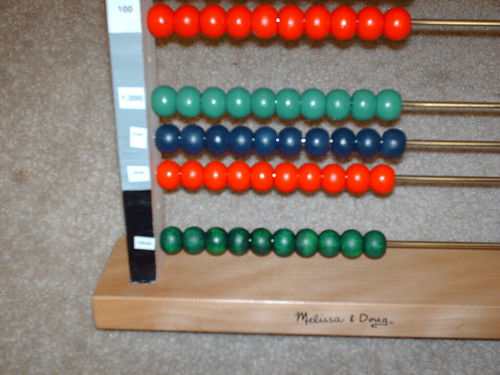
Remove all the beads from the rods and then remove the 1st, 5th, and 9th metal rod from the socket and discard. On the first metal rod (actually the 2nd one, but remember you removed the other one so now it's first), put on 10 of the green beads. On the next one, put on 10 blue beads and on the third one put on ten red beads. Then there should be a space and then repeat that again with 10 green, then 10 red and then 10 blue on the next 3 rods. On the last rod, there is supposed to be 10 green again, however, you are now out of green beads. On the melissa and doug acabus they have natural wood colored beads, so use 10 of those beads and paint them green. If you are lazy, like I was, you can use a green sharpie permenant marker and just color them. It worked great and wasn't messy at all. From a distance you can't even tell that I just colored them, but up close you can (see the last picture on the blog of the close-up). Once they are colored put them on the last rod. Then replace the other side of the acabus and screw it all back into place.
With the white paint, paint the entire front of the left side of the acabus. Then mix the black and the white to make grey and once the white paint is dry paint grey over the white starting below the first 3 metal rods all the way to the bottom so only the top is white. Then once that is dry paint from the below the 6th rod to the bottom with black paint. Lastly, you need to put the numbers on. You can paint them on with red paint. I used my label maker, because, again, I'm lazy and it's less messy. My label maker was only $15 at office depot and I use it to label all the containers I use for my montessori materials so I use it a ton! The numbers are
1
10
100
1,000
10,000
100,000
1,000,000
Anyways, I just thought it was great. I made this and it cost 1/2 the price of buying the cheapest one I could find anywhere on the internet and I also save the $8-15 they charge you for shipping. You could easily make the small bead frame the same way.
Subscribe to:
Posts (Atom)